Showing posts with label tangleation. Show all posts

Friday, October 15, 2021

Shaving tangles

Shaving: removing a small amount or a (thin) slice from the original form.

Almost any tangle you'd care to draw can be changed considerably by shaving it, but I find this idea works best with tangles that are composed of lines, like Emingle at the top here, rather than tangles that already come with black areas. 

I introduced shaved square grids here. Here's an example of a simple square grid (albeit curvy), shaved on two sides of the squares, with added Pearlz:

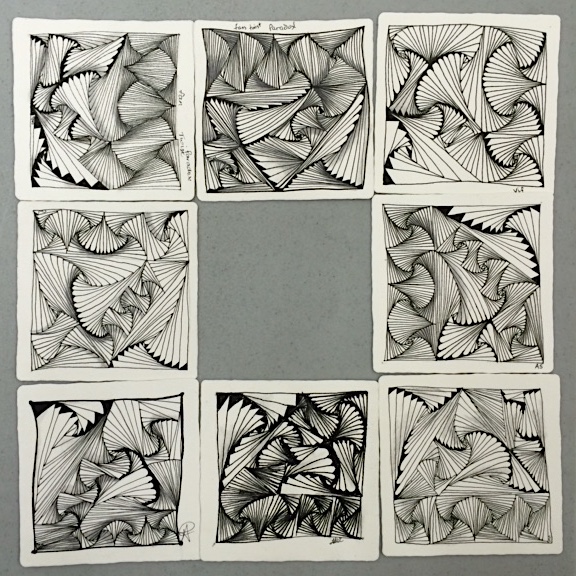
I introduced shaved Paradox here. Below are tiles done at a workshop I gave.

This technique can be used with lots of other tangles. Sometimes I shave inside the tangle, sometimes outside. Here are more possibilities:

The Zentangle-original tangle Stoic (a.k.a. Twile) shaved.
On the left, shaved at the permimeter of the squares.
On the right, shaved inside the squares.

All Boxed Up, shaved.
You'll need a wonky grid for this to work well.

Jalousie, shaved. Once I had that tilt happening
I decided to angle the "bubble on a stick" too.

Shaved 'Dillo

Shaved Bales, Cubine, and Knase

Shaved Tripoli, Dewd, Copada, and Paisley Boa.
Sometimes I like to make the shaved part look shiny,
or to add Pearlz in the shaved area.

It's also a great way to even things up if something you drew feels too wide, or to darken a tangle if you feel there's too much white (thanks to commenter Ragged Ray for that insight!).

Choose two or three tangles to shave, and see what happens!

Sunday, June 24, 2018

Cadent squared follow-up

I've been seeing some wonderful work inspired by my recent post Cadent squared, a simple tangleation of Cadent that creates lots of wonderful variations.

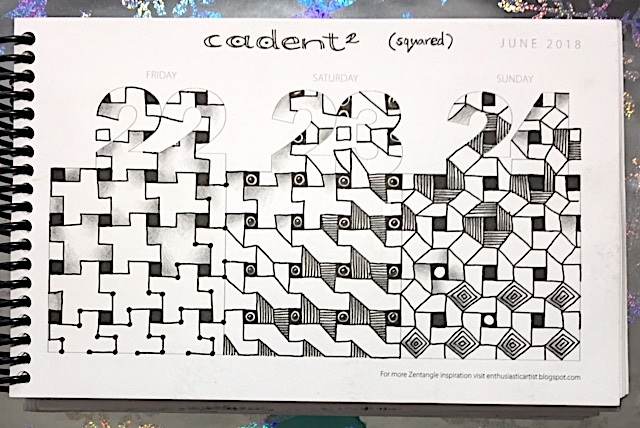
Here's a page from Anita Westin's Tangle-a-Day calendar showing the original curvy Cadent and a number of Cadent squared variations.
If the pattern is drawn large enough, the sections can be Aura'd inside, and another tangle drawn there. Here is an example from Jani Romero, a student of CZT Jan Brandt.
Marguerite Samama, a CZT in the Netherlands, sent me a picture of something she did using triangles for Cadent instead of squares. She's used circles for the initial points of reference and then done the connecting lines with a jog in them, as I showed in my earlier post. Quite a different look!

Here are some different variations from Tomàs Padrós, a tangler in Spain. Going from more detail in the center to less at the perimeter makes a very interesting tile.

I had a few more tries in my Tangle-a-Day calendar.


Thursday, May 3, 2018

CADENT SQUARED

One way to vary a tangle is to change straight lines for curvy ones, or vice versa. In this case it's vice versa - I've changed all the curvy lines in Cadent to straight ones. (I'd like to write it 'Cadent with a small superscript 2 beside the t' but I can't seem to do that in Blogger so I'll settle for Cadent2.
Tangles: Black Pearlz, Cadent2, Crescent Moon, Stoic, Tipple
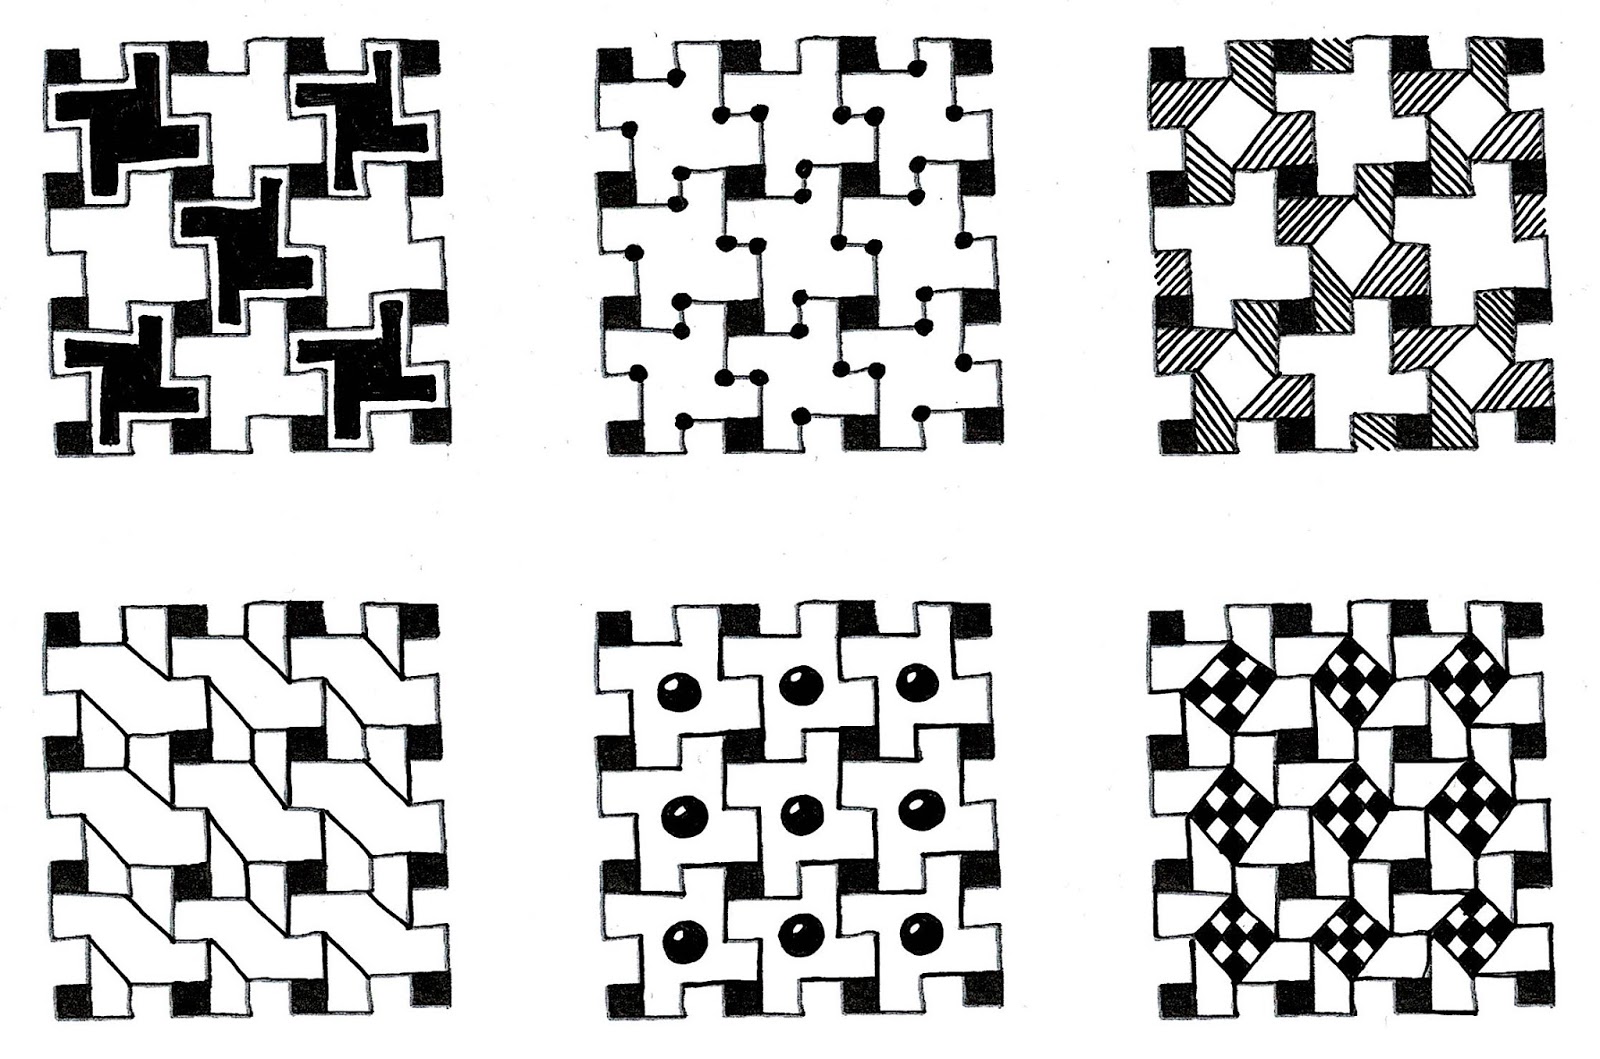
Start by drawing the grid of circles, but draw squares instead and fill them black.
As with the classic, curved Cadent, start at the bottom of one shape and move to the top of the next one. This time, however, draw a straight line halfway out, draw up the height of the square, and to the right again to connect with the next square. Do this for all the rows, then turn your paper 90 degrees and draw across in the other direction.

Now, instead of the 83 words above, here are three simple drawings:

As with the original Cadent, this tangleation has many possible variations by making small changes or additions. The squares could be left white. They could be done larger, or smaller. You could Aura inside the X-shapes. If the squares are large enough you could draw an interesting fragment in them.

At the bottom of the next tile is Cadent squared. On the right side is a gussied up original Cadent. At the top is Cadent2 with rounding. (For a lot of ideas for variations of the original Cadent check out the blog post here.)  
Tangles: Black Pearlz, Cadent, Cadent2, Crescent Moon
This effect is achieved quite simply by rounding all the corners. See the example in red below. Do this throughout and you'll end up with the pattern in the rest of the example.

Here are some other variations:
It's quite possible someone has stepped-out this tangleation before, and possibly given it its own name. If so, I'd be interested to know.
Tangles: Cadent2, Dewd, Knightsbridge, Shard, Snail

Monday, April 23, 2018

Floating Cubine

I like the impression of depth that can be achieved with some tangles and Cubine is a great example. It's like looking through little windows, or a sectioned box. But instead of doing Cubine in the classic square grid, you can use a single fragment of Cubine and place it in an empty space on your tile. I also recently referred to this as 'sprinkled' Cubines.

Here's an example of a floating Cubine. There are two Cubine fragments side-by-side creating 'holes', but the floating Cubine looks as if there's another hole through the main white section.
Tangles: Beadlines, Cubine, Knase, 'Nzeppel, Zonked.
Here's another example, amongst a lot of 'normal' Cubine fragments. (The floating one is off on the right side.)
In a Kitchen Table Tangles episode on the Zentangle Mosaic app Rick demonstrated a Cadent variation which quite enchanted me. The square shapes in the resulting pattern struck me as possible floating Cubine fragments so I did that in this tile. Here they are more "sprinkled". :)
Tangles: Cadent, Cubine, Pearlz
Finally, here's a tan tile just for something different. There are four floating Cubines here, well, actually three and a half.
Tangles: Apacore, Black Pearlz, Crescent Moon,
Cubine, Elirob, Tipple.
More ideas for variations of Cubine are in my "And then some" blog post here.

Thursday, November 26, 2015

Back to basics: Hollibaugh

The Diva's challenge this week is Hollibaugh, one of the first tangles anyone learns. I love Hollibaugh because of its simplicity, the 3D look once it's shaded, and the possibility of variations.

For my first tile I decided to use Hollibaugh as a string. I wanted to fill the spaces with a Hollibaugh variation I really like. I can't claim it as my own; I saw it way back in my early Zentangle days and unfortunately I can't even credit the original artist.

In this variation the bands are Rain, with auras. The Auras are useful to separate the Rain lines both from each other and from the background. The background is then filled with teeny-tiny circles, a variation of Tipple that I sometimes call Caviar. You can see this in the upper right corner. Then I went on to variations of that!
Tangles: Hollibaugh, Rain, Tipple (Caviar), and Auras
Next I did Hollibaugh over the entire tile, but with wide enough bands that I could fill a few of them. One was wide enough, and curvy enough, that I added a couple of splits.
Tangles: Dex, Hollibaugh, Knightsbridge, Pearlz, Snaylz
I want to use Renaissance (tan) tiles more frequently. I also wanted to try making the vibrantly colored gems I've seen a few people creating so wonderfully. So I put the two together. I love it!
Tangles: Hollibaugh, Pearlz, Snaylz, Tipple (Caviar again),
plus Auras and Perfs
A while ago I developed two variations of Hollibaugh. People thought they were sufficiently different that they deserved to be named and stepped-out. You might like to check out my blog posts about Morse and Windfarm.

Sunday, August 30, 2015

TIPPLE, and then some


DRAWING TIPPLE
Tipple is a simple and popular tangle that I imagine every CZT teaches an introduction class. But simple needn't be boring. There are many variations of this simple tangle, and I'd like to show you some.

While there are no online instructions for drawing Tipple, I’m fairly certain you can figure it out for yourself! This tangle is composed simply of various sizes of circles. The original tangle starts with larger circles, and continues filling with ever smaller circles until there's no more space.
On this tile I used various sizes of pen as well as  many variations of Tipple.
The two opposing corners were blacked in, then tangled in white ink.
PEBBLES OR BUBBLES?
You can draw the circles so they touch but don't overlap, or you can draw them so they do overlap. To me this is Tipple pebbles and Tipple bubbles. For an added bubbly look, break the line on the inside of a circle when the one you're drawing appears behind it.
There are a few examples of broken line bubbles in the tile below:

USE BLACK
Instead of drawing ever smaller circles, try eliminating the smallest circles, and filling the background with black.
That look can vary further by drawing larger circles at the center of your section, surrounded by smaller and then smaller circles, with black around the periphery. Or, in reverse.

BE ORGANIZED
The placement of the circles doesn't need to be random. Try drawing the circles from teeny-tiny to large beginning at the periphery, or at the middle. It's even better once you add shading, and is rather striking when you use this method in adjacent sections (see the tile above). If you begin the tiny circles at the periphery you might start to wonder "What was I thinking?!?" - it can seem a bit tedious for the first couple of rows. Trust me, it gets easier and the effect is worth it.

WEIGHTED TIPPLE
It's not necessary to fill an entire section. Pretend the balls have weight and are tumbled into the dips and corners of other tangles.
And don't fret. Gravity can be wherever you want it to be. This is art, not scientific illustration.
Tangles: Black Pearlz, Hibred, Lotus Pods, Phicops, Tipple
COMBINE IT
Tipple is terrific as a 'filler' pattern. Use it as an added element in other tangles for striking effects.
Tipple playing with Cadent, Paisley Boa, and Paradox
(For more about variations and fun with Cadent go to this blog post.)
(For more about variations and fun with Paradox go to this blog post.)
Tipple playing with Crescent Moon and W2.
SHADING AND HIGHLIGHTS
There are lots of ways to shade and highlight a circle so that it appears more spherical.
You can use pencil:
You can use pen:


AND THEN SOME MORE...
Moving slightly away from Tipple, I have seen it done where the circles/spheres are viewed more from the side and parts can't be seen.

Of course, you can always fill the circles, but then you're getting into making other tangles. There are quite a few tangles that begin like Tipple, with a lot of circles. Here are some you may like to try:

Finally, here's an all-in-one (well, almost) page for visual reference purposes.
HAVE FUN!

Tuesday, August 18, 2015

Undulating 'S' curve

This week's guest challenger on the DivaCZT blog is Sharla Hicks. Sharla's challenge is to use a C or S curve tangle and to work in a series. This is a wonderful way to push the boundaries and discover other ways of doing the same old thing. I usually find myself doing this with a monotangle or duotangle challenge. I get on a roll and one tile makes me think of something else that could be done.

When I read "S-curve" I knew immediately which pattern I would use, although it's one I've rarely used. It's called Mambo, and was designed by Helen Breil. I discovered it when I was hunting black-and-white patterns in between discovering Zentangle and becoming a CZT.

Here's my original note about Mambo, and how to draw it.

#1 - I used a simple, 3-line, lightning bolt string across the middle. I wanted only two variations per tile so I could see them easily. First I did Mambo as Helen did (left side), then filled alternate stripes black (right side).

#2 - Sharla suggested using Perfs and Auras as part of this investigation so I did Perfs on the left and Auras and Perfs on the right. I added Black Pearlz to a few too-white areas.

#3 - An easy way to vary a tangle is to vary the scale, so I did Mambo smaller, and larger.

#4 - I thought Mambo could be interesting as a border and tried that, small and large. The tangle in the center is my latest, Pixioze.

#5 - Then I thought, "The S's don't have to be empty" so I filled them with stripes (top).
In previous tiles some of the 'S's connected in ways that seemed like ribbons and I decided to explore that idea further (on the bottom).

#6 - Then I thought, "S's don't have to be curvy" so I did them with angles and corners (left). Then I realized that the angular S's could work in a rectangular grid (right). I experimented on the back of the tile first! Okay, not undulating, but still cool.

#7 - Filling in those two loops of the 'S' with stripes reminded me of Aquafleur, so I did one like that. If you look closely you'll see that the lightning bolt division is horizontal.
Other tangles: Aquafleur, Aura, Black Pearlz, Firecracker, Tipple

#8 - Then I thought, "It doesn't have to be a Roman letter S" so I did the only other one I know, an Arabic S. (My husband and several other people were having a meeting upstairs, so I was holed up in my basement studio for three hours. What can I say. I was becoming somewhat Mambo Undulation Variation Punch Drunk by this point!)
Other tangles: Beadlines, Crescent Moon, Pearlz, Tipple
#9 - Then for some reason I thought of Hollibaugh and decided to overlap some S's. It didn't really work out that way but I tried some other interesting ideas: curvy Knightsbridge, Aquafleur again, and a dovetailed corner (like Hibred).
Other tangles: Aquafleur, Knightsbridge, Tipple
At around 11:30 pm I decided I should go to bed.

The next day... yes, seriously. I was still thinking Mambo and S's and undulations.

#10 - Pencil outlines. I decided to use the S's as a string, although in the end many of them got outlined anyway.
Other tangles: Aquafleur, Beadlines, Black Pearlz,
Lamar, Paradox, Pearlz, Phicops
#11 - Then I noticed my computer wallpaper, a fabric swatch (isn't it gorgeous!?!?!) with spirals (like S ends, no?) with rolling zigzags on the outside.
Well, gee, I could try that too! I did. I turned it every which way, and it has to be on the diagonal. I like it, but I can't not see an 'S' !

I think that's all folks. I hope so. I have other things to do. Thanks Sharla! I'm not sure if this is what you had in mind, but I had fun. :)